
June 6, 2022
Dryer Repair
The most common reasons why a Whirlpool dryer will not start are an incoming power problem, a defective door switch, a blown thermal fuse, or a defective start switch. In some cases, a broken drive belt or failed drive motor will be responsible for the issue. Follow the steps below to diagnose the problem and fix the dryer.
This guide applies to most Whirlpool dryer models, including the following:
1LE4900XKW0, 1LE4930XKW0, 1LE5700XKW0, 1LE5920XKW0, 1LE7800XKW0, 1LG5701XKW0, 1LG5921XKW0, 1LG9801XKW1, 2LG5701XKW0, 3CE2110XMW0, 3CE2110XMW1, 3CE2110XMW2, 3CE2910XSN1, 3CE2910XSW0, GEW9200LW1, GEW9250PW0
1. Check the power supply
The most obvious reason a dryer will not start is that it is not receiving power. While you have likely checked that the dryer is plugged in and turned on, a tripped breaker or power socket issue could be causing the problem.
Using an extension cord with your dryer could also be causing the dryer not to start, as extension cords often cannot safely transmit the electricity required to power the dryer.
Follow these steps to check the power supply:
- Check your home’s electrical panel for a tripped breaker or a blown fuse. A dryer usually has two breakers. Both of these should be reset to try and fix the problem.
- Use a multimeter to test the electrical socket the dryer is plugged into. Each side should have 120 volts and 240 volts in total (+/- 10%).
2. Check for an issue with the dryer door
For safety, dryers will not operate if the door is not closed. If the dryer will not start, there may be an issue with the door strike, latch, or the door switch. Listening for the door locking when you open and close the dryer door, and checking the door is securely closed may help diagnose the issue.
A defective door switch usually means either the contacts inside or the actuator arm have broken. Typically, the door switch is mounted to the door – behind the front panel. The front door panel or front control panel needs to be removed to locate the switch.
Follow these steps to check for a faulty dryer door:
- Check that the door strike and latch are not missing or damaged
- Unplug the dryer or turn off the gas
- Access the door switch
- Disconnect the wires connected to the door switch
- Use a multimeter to test the switch for continuity. Depending on the model, you may need to refer to the wiring diagram to figure out the terminals that need to be tested
- Make sure the door switch has continuity when the door switch is pressed.
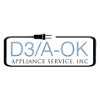
3. Check for a blown thermal fuse
Dryers may contain one or more thermal fuses, which are safety features to shut off the dryer if it overheats. Thermal fuses can be tested with a multimeter for continuity to determine if they have blown. Once a thermal fuse blows, it needs to be replaced.
The thermal fuse is usually located close to the blower wheel or heating element. Depending on your model, to access the fuse, either the dryer’s rear panel will need to be removed, or the dryer cabinet will need to be disassembled.
Thermal fuses are there for a reason. If a thermal fuse has blown, make sure you address the issue that caused the thermal fuse to blow.
Follow these steps to check the thermal fuse:
- Unplug the dryer or turn off the gas to the dryer
- Access the thermal fuse
- Test the thermal fuse for continuity with a multimeter. If the fuse does not have continuity, it needs to be replaced.
4. Check the start switch
Another reason your dryer might not be working is a defective start switch. If you activate the start switch and don’t hear anything, the start switch may be the problem (especially if the components above are not responsible). If the dryer makes a humming sound when the start switch is activated, it is more likely to be a drive belt or motor issue.
Follow these instructions to check the start switch:
- Unplug the dryer or turn off the gas
- Access the start switch by removing the front panel or control panel on the dryer
- Disconnect the wires attached to the start switch and remove the switch from the dryer
- Test the start switch for continuity with a multimeter. When the start switch is activated, it should have continuity (a continuous electrical path)
- If the start switch fails the continuity test, replace it.
5. Check the dryer belt
Most Whirlpool dryer models have a drive belt that helps turn the dryer drum. If the belt breaks, the motor may hum, but the drum won’t turn.
The drive belt wraps around the dryer drum. The top panel of the dryer needs to be removed to check the belt, which usually means disassembling the dryer cabinet. If the belt has broken, you will need to remove the front or rear panel to install a new belt.
Some models may also have a belt switch, which shuts off power to the dryer if the belt breaks. If the belt has not broken, the belt switch may be defective and wrongly causing the dryer not to work. Therefore, if the belt is not broken, check for a defective belt switch.
Follow these instructions to check the dryer belt:
- Unplug the dryer or turn off the gas
- Remove the relevant panels to locate the drive belt
- Check that the belt hasn’t broken
- Replace a broken drive belt.
6. Check the dryer motor
If the steps above have failed to fix the problem, the dryer motor may have failed. The motor drives the belt to turn the drum and operates the blower wheel.
Before replacing the motor, make sure the blower wheel can turn freely. If something is stopping the blower wheel from turning, the dryer won’t be able to operate.
With most models, the dryer will need to be disassembled to access the motor and blower wheel. With some models, you may be able to access the motor by removing the rear access panel.
Follow these instructions to access the dryer motor:
- Unplug the dryer or turn off the gas
- Remove the relevant panels to access the motor
- Remove the motor from the dryer (take care not to damage the wiring)
- Test the motor for continuity with a multimeter. If the motor fails the continuity test, it needs to be replaced.
Apr. 09, 2024
Why Is My Microwave Sparking?
Mar. 06, 2024
Understanding Frigidaire Dishwasher Error Codes
Feb. 05, 2024
How to Dry Shoes in Dryer Without Damaging Them
Jan. 03, 2024
Why Is My Dishwasher Leaking?
Dec. 11, 2023
How to Solve Electrolux Dryer Error Code E64

Nov. 06, 2023
Microwave Light Won’t Turn Off? Here’s Why
Oct. 02, 2023
GE Oven F9 Error Code: How to Fix It
Sep. 08, 2023
How to Use a Self-Cleaning Oven (In 4 Steps)
Jul. 31, 2023
How To Use a Maytag Top-Load Washing Machine
Jul. 19, 2023
What to Do If Your Samsung Ice Maker Is Not Making Ice
Jun. 13, 2023
How to Fix a Microwave Turntable That’s Not Turning
May. 08, 2023
How to Wash Pillows in a Washing Machine
Apr. 10, 2023
How to Fix an Ice Maker That Isn’t Working
Mar. 14, 2023
Broken Refrigerator Door Seal? How To Fix It
Feb. 01, 2023
Samsung Dishwasher Not Draining? Here’s What to Do
719 - 574 - 3344Give us a call!